

The Best Methods for PETG Filament Smoothing
Josh BonninShare
The Best Methods for PETG Filament Smoothing
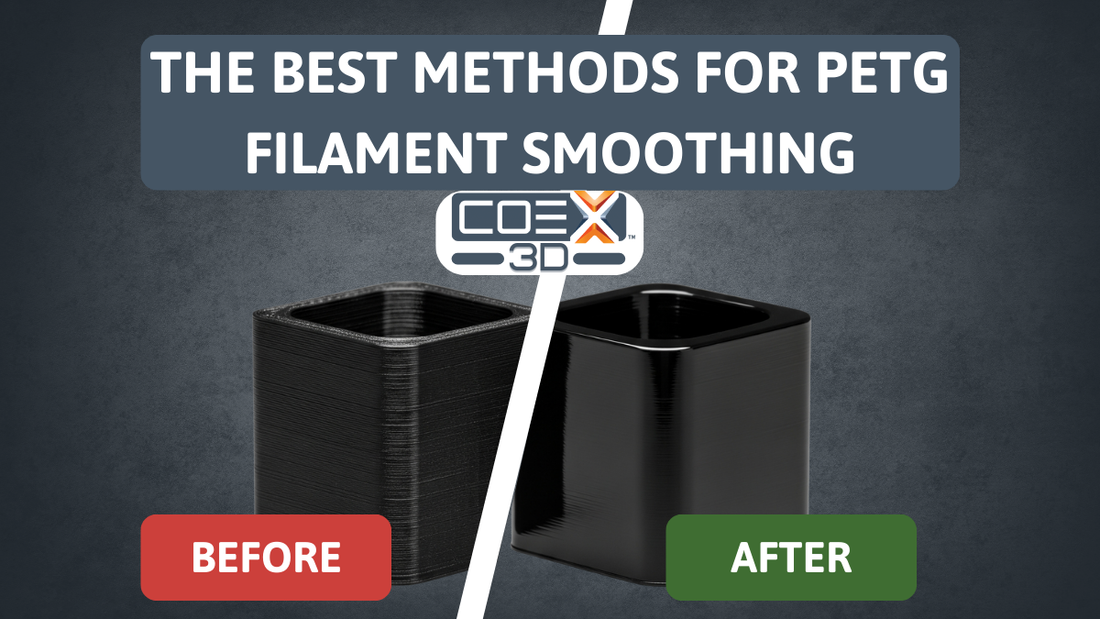
PETG filament is one of the most popular materials for 3D printing, second only to PLA filament. PETG is a fantastic all-around filament for 3D printing, known for its durability, flexibility, and ease of use. However, like most Fused Deposition Modeling (FDM) prints, the layer lines can sometimes leave something to be desired in the aesthetics department. The good news is that achieving a glass-like, smooth surface on your PETG prints is entirely possible with a bit of post-processing. This guide will walk you through the best methods to smooth your PETG 3D prints, from simple sanding to more advanced chemical techniques, ensuring you have all the information to choose the right approach for your project.
1. The Tried and True: Sanding and Polishing
Sometimes the simplest methods are the most effective. Sanding is a fundamental post-processing technique that works well with PETG, providing a high degree of control over the final finish.
What you'll need:
-
Sandpaper of various grits (from 200 to 2000 or higher)
-
A bowl of water (for wet sanding)
-
Clean cloths
-
Optional: Polishing compound and a buffing wheel or microfiber cloth
The Process:
Start with a lower grit sandpaper (around 200-400 grit) to remove the most prominent layer lines and imperfections. It's crucial to sand in a circular motion to avoid creating deep scratches. As you progress, gradually move to higher grit sandpapers, such as 600, 1000, and eventually 2000 or higher, for a finer finish.
For an even smoother result, consider wet sanding. Soaking the sandpaper in water helps to prevent plastic dust from clogging the paper and creates a more polished surface. Once you're satisfied with the sanding, wipe the print clean and let it dry completely.
To take it a step further, you can apply a polishing compound. Use a small amount on a clean cloth or a buffing wheel and work it into the surface of the print until you achieve the desired level of shine.
Pros:
-
High level of control
-
Relatively safe
-
Inexpensive and readily available materials
Cons:
-
Can be time-consuming and labor-intensive
-
It can be difficult to sand intricate or detailed models evenly
2. A Glossy Finish: Heat Gun Treatment
A heat gun can be a quick and effective way to achieve a smooth, glossy finish on your PETG prints. The key is to melt the very outer layer of the plastic just enough to allow the layer lines to fuse.
What you'll need:
-
A heat gun with adjustable temperature settings
-
A well-ventilated area
-
A heat-resistant surface to work on
The Process:
Set your heat gun to a low to medium temperature, typically around the glass transition temperature of PETG, which is approximately 85°C. Hold the heat gun several inches away from the print and move it continuously across the surface. It's crucial to keep the heat gun moving to avoid overheating and deforming any specific area.
The goal is to apply just enough heat to see the layer lines disappear and the surface become glossy. This process requires a bit of practice to perfect, so it's a good idea to test it on a scrap print first.
Pros:
-
Quick and efficient for large surfaces
-
Can produce a very glossy finish
Cons:
-
Risk of overheating, warping, and ruining the print
-
Difficult to control on small or detailed parts
-
May not remove deeper imperfections
3. The Flawless Coating: Epoxy Resin
For a truly flawless and durable finish, coating your PETG print with epoxy resin is an excellent option. The resin fills in the layer lines and creates a smooth, hard shell.
What you'll need:
-
Two-part epoxy resin (look for self-leveling varieties)
-
Mixing cups and stir sticks
-
A disposable brush
-
A well-ventilated workspace
-
Protective gloves and eyewear
The Process:
Before you begin, it's a good idea to lightly sand the print to help the epoxy adhere better. Mix the two-part epoxy according to the manufacturer's instructions. Using a disposable brush, apply a thin, even coat of the resin to the entire surface of your print. Try to avoid bubbles, but if they appear, you can often pop them with a gentle puff of air from a straw or a heat gun on its lowest setting.
Let the epoxy cure completely in a dust-free environment. The curing time will vary depending on the brand of resin, so be sure to check the instructions. Once cured, you'll have a hard, glossy, and perfectly smooth finish.
Pros:
-
Creates a very smooth and durable surface
-
Fills in layer lines and imperfections effectively
-
Can add strength to the print
Cons:
-
It can be messy to work with
-
Adds thickness to the print, which may not be suitable for all models
-
Requires a curing time
4. The Advanced Method: Chemical Smoothing
Chemical smoothing, often referred to as vapor smoothing, uses solvents to dissolve the outer layer of the plastic, resulting in an incredibly smooth, injection-molded look. For PETG, this is a more advanced technique that requires significant safety precautions due to the hazardous nature of the chemicals involved. This method is not recommended for beginners and should only be attempted in a well-ventilated area with appropriate personal protective equipment (PPE).
Effective Solvents for PETG:
-
Methyl Ethyl Ketone (MEK): A common solvent for PETG.
-
Dichloromethane (DCM): A very effective but also very hazardous solvent.
-
Ethyl Acetate: A less aggressive and safer alternative that can be effective on some PETG brands.
The Vapor Smoothing Process (General Overview):
The general principle of vapor smoothing involves creating a solvent vapor environment that the print is exposed to. A common method involves placing paper towels soaked in the solvent inside a sealed container (that is not made of a material the solvent will dissolve). The 3D print is then placed on a platform inside the container, elevated above the soaked towels. The container is sealed for a short period, allowing the vapors to smooth the print's surface.
Crucial Safety Precautions:
-
Ventilation: Work in a very well-ventilated area, preferably outdoors or in a fume hood.
-
PPE: Always wear chemical-resistant gloves, safety goggles, and a respirator with appropriate cartridges for organic vapors.
-
Fire Safety: Keep all flammable solvents away from heat sources and open flames.
-
Research: Thoroughly research the specific safety data sheet (SDS) for any chemical you use.
Step-by-Step with Ethyl Acetate (a safer option):
-
Prepare your workspace: Ensure excellent ventilation and put on your PPE.
-
Prepare the container: Use a container made of a material that ethyl acetate won't dissolve (e.g., glass or polypropylene). Line the bottom and sides with paper towels.
-
Apply the solvent: Carefully apply a small amount of ethyl acetate to the paper towels.
-
Place the print: Suspend your PETG print inside the container, ensuring it does not touch the solvent-soaked towels.
-
Seal and wait: Seal the container and monitor the print closely. The smoothing process can take anywhere from a few minutes to a couple of hours.
-
Remove and air out: Once the desired smoothness is achieved, carefully remove the print and let it air out in a well-ventilated area until the solvent has completely evaporated and the print is no longer tacky.
Pros:
-
Can produce a perfectly smooth, injection-molded finish
-
Effective for complex geometries
Cons:
-
Involves hazardous chemicals that require strict safety protocols
-
Can be difficult to control and may lead to a loss of detail
-
Not all PETG filaments react the same way to all solvents
Conclusion: Choose the Right Method for You
The best method for smoothing your PETG 3D prints ultimately depends on your desired finish, the complexity of your model, and your comfort level with the different techniques. For most users, starting with sanding and polishing is a great way to achieve excellent results safely. If you're looking for a quick, glossy finish, a heat gun can be a valuable tool with a bit of practice. For a flawless, durable coating, epoxy resin is a fantastic option. Chemical smoothing should only be undertaken by experienced users who can adhere to the necessary safety precautions. By understanding the pros and cons of each method, you can confidently choose the right approach to elevate your PETG prints from good to exceptional.